Skipping the Wait: Turn Your RAV4 Prime SE into an XSE (Updated November 2026)
Dealer allocation queues for the RAV4 Prime XSE Technology Package remain backed up over a year across Canada. Taking delivery of a base SE or XLE trim and installing community-proven acoustic, upholstery, and dashcam upgrades in an afternoon gets you on the road faster while saving thousands of dollars.
1. The Allocation Reality: SE vs. XSE Wait Times
In Canadian dealerships (especially across British Columbia, Quebec, and Ontario), Toyota Canada allocates roughly 3 to 4 base SE trims for every single XSE Technology Package that leaves the factory in Japan.
Early allocation batches. Significantly shorter queue.
Multi-season marathon. High demand, strict factory quotas.
By telling your dealer you will accept an SE allocation if one becomes available earlier, Canadian buyers frequently shave 6 to 12 months off their delivery wait time.
Cabin Ergonomics & Long-Distance Comfort (Stage 1.5)
Community feedback from long-distance Canadian RAV4 drivers identifies two major daily ergonomics pain points on extended highway trips:
The Problem: Hard Plastics & Elbow Fatigue
“The 5th-generation RAV4 cockpit features firm plastics right where the driver's right leg rests against the center stack tunnel, coupled with a firm factory armrest that quickly wears under daily commuting.”
0.5" Memory Foam Padding & Stitching Protection
Slip-on padded covers are preferred over full lid replacements because they preserve original factory stitching, add approximately 0.5" of plush memory foam cushioning to relieve forearm fatigue, and shield the factory vinyl from sunscreen oils, sweat, and dog paws.
Eliminate Highway Right-Knee Soreness
Extended highway driving creates a notorious contact pressure point where the driver's right knee braces against the rigid console tunnel plastic. Low-profile self-adhesive leather knee cushions cushion this contact zone completely without interfering with seatbelts, cup holders, or passenger legroom.
Partner Spotlight: Muslogy Direct-Fit Cabin Solutions
Exclusive 2% Off • Code: Toyotawaits Preview ↗
Muslogy Custom-Fit Padded Center Console Armrest Cover
Ergonomic soft memory-foam padded leatherette console cover that relieves arm fatigue and protects factory upholstery.
 Preview ↗
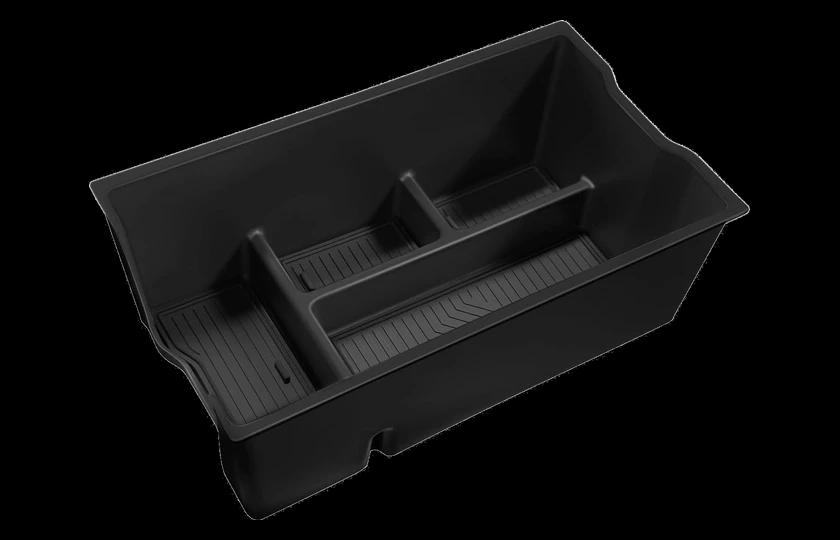
Muslogy Dual-Tier Drop-In Organizer Tray (RAV4)
Dual-tier armrest storage divider.
Recommended Ergonomic Gear (Stage 1.5)
Verified OEM Fit: 2019–2026 RAV4 / Hybrid / Prime Preview ↗
Custom-Fit Padded Center Console Armrest Cover
$24 – $32 CADSoft memory-foam padded neoprene/leatherette slip cover that relieves forearm fatigue on long trips and protects the factory armrest from sweat, pets, and wear.
 Preview ↗
Driver Side Console Edge Leather Knee Cushion
$14 – $19 CADStops right knee soreness.
As an Amazon Associate, ToyotaWaits earns from qualifying purchases. Real-time pricing and stock verified on Amazon.ca and Amazon.com.
Stealth OEM+ Audio Overhaul (2019–2026 Non-JBL Fix)
You do not need to wait 12+ months for a JBL-equipped XSE or Limited trim to get rich, balanced cabin acoustics. This 4-piece plug-and-play blueprint transforms the 2019–2026 RAV4 non-JBL sound system without splicing a single factory wire, tripping hybrid 12V sensors, or sacrificing rear cargo space.
Why 2026 Base/XLE Audio Sounds Thin
The factory 6-speaker non-JBL setup on LE, XLE, SE, and Woodland trims pairs severely underpowered head-unit channels (~12–15W RMS) with lightweight paper-cone drivers and tiny magnets. Crucially, swapping dash speakers alone without clean amplification can make highs overly bright while leaving mid-bass weak—because high-sensitivity 3.5" dash coaxials overpower the unamplified factory door woofers. Feeding all channels clean inline power first balances the soundstage before upgrading the speakers and under-seat bass.
The 4-Piece Plug-and-Play Recipe
Beat-Sonic ENA-3T3 Micro-Amp
Plugs inline behind the factory screen via T-harness; zero wire cutting, safe for hybrid 12V systems, and adds a dedicated RCA sub output.
Kicker KSC3504 / JBL Club 34F
Drop-in replacement using Metra 72-8110 harnesses that lifts vocals and clears up muffled factory treble in 20 minutes.
Kicker CS Series (46CSC654)
Mounted with Metra 82-8148 adapters and Metra 72-8104 leads to replace weak paper-cone drivers for tighter mid-bass without rattling.
Alpine PWE-S800 Powered Sub
Connects to the Beat-Sonic RCA pre-out under the front passenger seat with zero lost cargo volume.
Verified 2019–2026 Non-JBL Audio Upgrade Kit
Zero-404 Amazon Search Routing • CA & US SupportBeat-Sonic ENA-3T3 Plug-and-Play Micro Amplifier
~$380 CADInline T-harness micro-amp (50W x 4 peak) that mounts behind the factory multimedia screen with zero wire splicing and a built-in RCA sub pre-out.
Kicker KSC3504 3.5" Coaxial Dash Speakers + Metra 72-8110 Harness
~$95 – $128 CAD20-minute drop-in dash corner upgrade that lifts vocals and clears up muffled factory treble.
Kicker CS Series 6.5" Door Speakers + Metra 82-8148 Brackets
~$149 CADReplaces weak factory paper-cone door drivers for tighter mid-bass without rattling.
Alpine PWE-S800 8" Compact Under-Seat Powered Subwoofer
~$399 CADShallow cast-aluminum powered sub that fits under the front passenger seat, preserving 100% of rear cargo space.
1. Step 1 — Inline Power: Beat-Sonic ENA-3T3 Plug-and-Play Micro Amplifier
💡Installer's Pro-TipShow tip▼
The Beat-Sonic ENA-3T3 micro power amp is the cornerstone of the non-JBL stealth overhaul. It connects inline directly behind the factory multimedia touchscreen with a custom Toyota T-harness—zero wire cutting, safe for hybrid 12V systems, and adds a dedicated RCA sub output that eliminates the need for an external Line Output Converter (LOC).
Mount the compact micro-amp module behind the lower glovebox or behind the radio bracket using heavy-duty 3M VHB automotive tape and zip-ties. Pre-set gain dials to ~50% before re-assembling the dash trim.
⚖️Factory Problem vs. SolutionCompare▼
🔧Installation Walkthrough (6 Steps)Show Steps▼
- Remove the lower passenger dash trim and unclip the glovebox dampener arm to lower the glovebox.
- Unclip the center multimedia touchscreen bezel and remove the four 10mm head-unit mounting bolts.
- Pull the touchscreen forward and disconnect the factory 28-pin/10-pin audio harness plugs.
- Click the Beat-Sonic T-harness between the factory vehicle plugs and the touchscreen receptacles.
- Route the dedicated RCA subwoofer preamp cable down towards the passenger seat well.
- Secure the micro-amp behind the dash frame using automotive zip ties and test audio playback before snapping trim back.
Outbound links route through our privacy-safe proxy. As an Amazon Associate, toyotawaits.ca earns from qualifying purchases at no extra cost to you.
2. Step 2 — 3.5" Dash Corner Speakers (Kicker KSC3504 / JBL Club 34F)
💡Installer's Pro-TipShow tip▼
Factory dash locations house fragile paper cones that swallow podcast dialogue and high-frequency detail. Drop-in 3.5-inch coaxial replacements (Kicker KSC3504 or JBL Club 34F) paired with Metra 72-8110 harnesses lift vocals to ear level and clear up muffled factory treble in 20 minutes without cutting any wires.
Use plastic nylon pry tools along the windshield edge to pop corner grilles straight up. Point speaker terminals towards the cabin so they do not press against the defroster air duct underneath.
⚖️Factory Problem vs. SolutionCompare▼
🔧Installation Walkthrough (5 Steps)Show Steps▼
- Insert a nylon trim pry tool along the outer edge of each corner dash grille and gently pop the retaining clips upwards.
- Remove the two 10mm (or 8mm) factory hex screws securing each paper speaker cone.
- Disconnect the factory electrical connector from the OEM speaker.
- Plug the Metra 72-8110 adapter harness into the factory vehicle connector, then slide the spade connectors onto the new speaker terminals.
- Screw down the new 3.5" speaker with factory hardware and snap the protective grille flush.
Outbound links route through our privacy-safe proxy. As an Amazon Associate, toyotawaits.ca earns from qualifying purchases at no extra cost to you.
3. Step 3 — 6.5" Door Speakers (Kicker CS Series)
💡Installer's Pro-TipShow tip▼
Factory door drivers use flimsy paper diaphragms with tiny quarter-sized magnets that bottom out when bass kicks in. Replacing the door drivers with Kicker CS Series (46CSC654) 6.5-inch coaxial speakers mounted with Metra 82-8148 adapters and Metra 72-8104 leads delivers tighter mid-bass without rattling.
Apply a 10-inch strip of sound deadening mat (butyl damping) around the inner sheet metal behind each speaker bracket to stop panel rattles and maximize door mid-bass resonance.
⚖️Factory Problem vs. SolutionCompare▼
🔧Installation Walkthrough (6 Steps)Show Steps▼
- Remove the door panel trim screws hidden behind the interior door handle cup and armrest grab handle.
- Pry along the bottom and side edges of the door card to release the plastic retaining clips, then unhook the door lock and latch cables.
- Drill out the three aluminum factory rivets holding the OEM speaker cone using a 3/16" drill bit.
- Bolt the Metra 82-8148 speaker adapter bracket firmly into the factory rivet holes.
- Click the Metra 72-8104 harness leads into the vehicle speaker plug and slide terminals onto the Kicker CS driver.
- Fasten the speaker into the bracket, test audio, and snap the interior door card back onto the frame.
Outbound links route through our privacy-safe proxy. As an Amazon Associate, toyotawaits.ca earns from qualifying purchases at no extra cost to you.
4. Step 4 — Under-Seat Bass (Alpine PWE-S800)
💡Installer's Pro-TipShow tip▼
Traditional trunk subwoofers sacrifice stroller or camping cargo space and risk hitting high-voltage hybrid wiring. The Alpine PWE-S800 packs 120W RMS (240W peak) in a shallow cast-aluminum enclosure that fits under the front passenger seat and connects directly to the Beat-Sonic RCA pre-out with zero lost cargo volume.
Route the RCA cables down the center console tunnel beneath the passenger carpeting. Connect the 12V constant wire with an inline fuse to the 12V auxiliary battery, and secure the chassis ground to the bare metal front seat bracket bolt.
⚖️Factory Problem vs. SolutionCompare▼
🔧Installation Walkthrough (6 Steps)Show Steps▼
- Slide the front passenger seat all the way forward and tilt it up to expose the floor cavity beneath the seat rail.
- Verify clearance above the rear passenger floor air duct (the 3-inch shallow Alpine enclosure clears with room to spare).
- Route the shielded RCA audio cable from the Beat-Sonic ENA-3T3 amp down the passenger console trim to the sub location.
- Connect the sub remote turn-on lead and 12V auxiliary power wire with the supplied inline 15A fuse.
- Fasten the sub chassis to the carpet using the included heavy-duty hook-and-loop mounting brackets to prevent sliding.
- Tune the low-pass filter (LPF) to ~80Hz and adjust the wired bass remote knob from the driver cockpit.
Outbound links route through our privacy-safe proxy. As an Amazon Associate, toyotawaits.ca earns from qualifying purchases at no extra cost to you.
3. Custom Leather Upholstery: Clazzio & EKR vs. Factory SofTex
2. Tailored Leather Upholstery: Clazzio or EKR Custom Covers
💡Installer's Pro-TipShow tip▼
Why pay $4,800+ CAD more for the XSE trim just to get SofTex leather? Clazzio (perforated genuine leather inserts) and EKR (4-layer waterproof leatherette) are patterned for 5th Gen (2019–2025) RAV4 seats. 6th Gen (2026+) seat patterns are not yet confirmed — check the seller's listed model years before ordering. For seats with side airbags, follow the cover manufacturer's airbag-compatibility guidance and your Toyota owner's manual.
Warm the covers indoors or under sunlight before installation to maximize leatherette flexibility. Sliding a thin plastic grocery bag over headrests helps the snug covers slide on without snagging.
⚖️Factory Problem vs. SolutionCompare▼
🔧Installation Walkthrough (5 Steps)Show Steps▼
- Warm covers indoors before installation to maximize material elasticity and ease stretching.
- Slip the bottom cushion cover over the seat base and feed the anchor chucks through the rear cushion crevice.
- Pull the lower anchor straps tight underneath the seat frame and secure the industrial hook-and-loop fasteners.
- Slide the backrest cover down over the seat upright, following the cover manufacturer's instructions for seats with side airbags.
- Slide custom headrest covers on and tuck the lower seam flap underneath the plastic bezel.
Outbound links route through our privacy-safe proxy. As an Amazon Associate, toyotawaits.ca earns from qualifying purchases at no extra cost to you.
4. FitcamX OEM Integrated 4K Dash Camera
3. FitcamX Integrated OEM-Style 4K Dashcam
💡Installer's Pro-TipShow tip▼
FitcamX replaces the factory plastic rearview mirror shroud and taps directly into the Toyota Safety Sense (TSS) camera power harness with zero visible wires, no windshield suction cups, and no fuse box routing through the side curtain airbag.
Tuck the pass-through Y-harness flat against the windshield glass before snapping the lower cowl into place. Make sure to format your high-endurance MicroSD card directly in the FitcamX smartphone app.
⚖️Factory Problem vs. SolutionCompare▼
🔧Installation Walkthrough (5 Steps)Show Steps▼
- Pry off the factory two-piece mirror shroud behind the rearview mirror using a nylon pry tool.
- Unplug the factory TSS radar or auto-dimming mirror power harness connector.
- Insert the FitcamX plug-and-play pass-through Y-splitter harness between the factory vehicle harness and sensor socket.
- Connect the camera lead, align the housing clips, and snap the assembly flush onto the mirror base.
- Insert a high-endurance MicroSD card and verify live 4K recording angles via the mobile app.
Outbound links route through our privacy-safe proxy. As an Amazon Associate, toyotawaits.ca earns from qualifying purchases at no extra cost to you.
5. Cost vs. Wait-Time Financial Breakdown
| Feature / Upgrade | Factory XSE Package | SE + DIY Playbook | Your Savings |
|---|---|---|---|
| Stealth “OEM+” Audio PackageBeat-Sonic Amp + 3.5" Dash + 6.5" Doors + Alpine Sub | Factory JBL (Bundled in XSE/Tech) | ~$1,023 CAD (Full 4-Piece Package) | Studio Sound + 100% Trunk Space |
| Stage 1 Dash Audio Only | Factory JBL (Bundled) | 3.5" Coaxial + Metra Harness ($113 CAD) | Included in $113 |
| Leather / SofTex Seats | SofTex (Bundled in XSE) | Clazzio / EKR Covers (~$550 CAD) | ~$550 total |
| Integrated 4K Dashcam | Dealer Port Option ($550+ CAD) | FitcamX TSS Tap ($210 CAD) | $340 CAD saved |
| MSRP Trim Difference | +$4,800 to +$8,200 CAD | ~$1,783 CAD complete spec | > $3,000 to $6,400 CAD saved |
| Delivery Wait Time | 410 – 540 Days | 180 – 240 Days | 6 to 12 Months Faster |
ToyotaWaits.ca participates in privacy-safe affiliate programs. When you follow product links via /out/[slug], we may earn an affiliate commission at no extra cost to you. We route all outbound clicks through our zero-PII serverless proxy to prevent advertising pixels from tracking your browsing activity.
As an Amazon Associate, toyotawaits.ca earns from qualifying purchases at no extra cost to you.